Start Your Engines - Capturing the First Flag in Google's New v8CTF
Background
In early October 2023, Google announced a new addition to their reward program, v8CTF. According to the rules: “v8CTF is a part of the Google VRP in which we reward successful exploitation attempts against a V8 version running on our infrastructure.” The nice thing about this program is that it accepts reports for vulnerabilities that have already been reported/patched, as long as you can prove that they are exploitable. I really enjoy writing exploits for v8 vulns and had not completed one for 2023, so I was excited to try and submit something. I wasn’t able to actually start working on this until a couple of weeks after the challenge had opened. However, to my surprise, nothing had been submitted yet, so there was still a chance! This post recaps a caffeine-fueled 48 hours of trial and error to defeat the latest v8 protections and retrieve the first flag from v8CTF.
Overview
This post will detail the exploit that I wrote to successfully compromise v8 version 11.7.439.3, part of Chrome version 117.0.5938.62 for Linux. I chose to exploit Issue 1472121, a vulnerability in the inline cache (IC) component. The exploit involved escaping the in-progress v8 sandbox in order to execute arbitrary shellcode, and eventually retrieve the flag hosted on the CTF infrastructure. In this post I will also link some helpful resources that I used while developing my exploit. Many techniques have become obsolete over this past year, but these posts helped provide me a good foundation, so I have included them to build a timeline and thank other v8 researchers.
The Vulnerability
I found the vulnerability which I chose to exploit by searching the git log for any issues that looked easily exploitable. One reason that Issue 1472121 appeared so promising was that the commit to patch it had a regression test attached which showed the bug being triggered, as well as corrupting an object’s metadata. Since I was focused on moving to exploitation as quickly as possible, I initially took the regression test and immediately began to work on gaining code execution. However, since it is a useful exercise, I will go through the details of the vulnerability here. The bug report was locked when I first worked on this, but has since been derestricted and can provide additional details. First, let’s look at the commit message:
1
2
3
4
5
6
7
8
[ic] Fix clone ic when the target has fewer inobject properties

The clone ic miss handler did not correctly anticipate that the target
map chosen by the runtime clone implementation can pick a target map
with fewer inobject properties. In this case inobject properties need to
be moved to normal properties, which the fast case cannot.

Bug: chromium:1472121
The commit message provides a very detailed description of the vulnerability, but it will be useful to see how this plays out in a debugger. Specifically I want to look at the maps of various objects and their property layouts. I prefer to look at vulnerabilities from a top-down perspective so I’ll begin with the, slightly modified, regression test:
1
2
3
4
5
6
7
8
9
10
11
12
13
14
15
16
17
18
19
20
21
22
23
24
25
26
27
28
29
30
// Copyright 2023 the V8 project authors. All rights reserved.
// Use of this source code is governed by a BSD-style license that can be
// found in the LICENSE file.

let subject = {p0: 1, p1: 1, p2: 1, p3: 1, p4: 1, p5: 1, p6: 1, p7: 1, p8: 1};
subject.p9 = 1;

function throwaway() {
	return {...subject, __proto__: null};
}

for (let j = 0; j < 100; ++j) { // IC
	throwaway();
}

for (let key in subject) {
	subject[key] = {};
}

function func() {
	return {...subject, __proto__: null};
}

for (let j = 0; j < 100; ++j) { // IC
	corrupted = func();
}

corrupted.p9 = 0x42424242 >> 1;

%DebugPrint(corrupted);
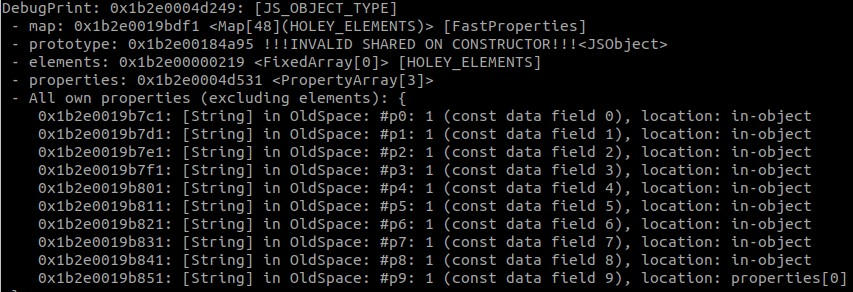
Running this code does indeed cause a debug check or crash on the print statement. In order to get a better idea of what happened, we can remove the write to corrupted.p9 and look at the layout of corrupted. Based on this output, it seems as though some properties overlap with the object itself, which can be confirmed in GDB. This also explains why we get a crash, since corrupted.p9 overlaps with the elements store pointer and changing this value leads to problems while printing the object.
There are some useful debugging features that can be introduced to a script in v8 by running it with the
--allow-natives-syntaxflag. For example, some functions that I added to my script were%SystemBreak()and%DebugPrint(object). There is also a gdbinit file which adds extra debugger commands.
Since there is an incorrect properties layout here, the first important area to cover is how this storage works.
Object Properties
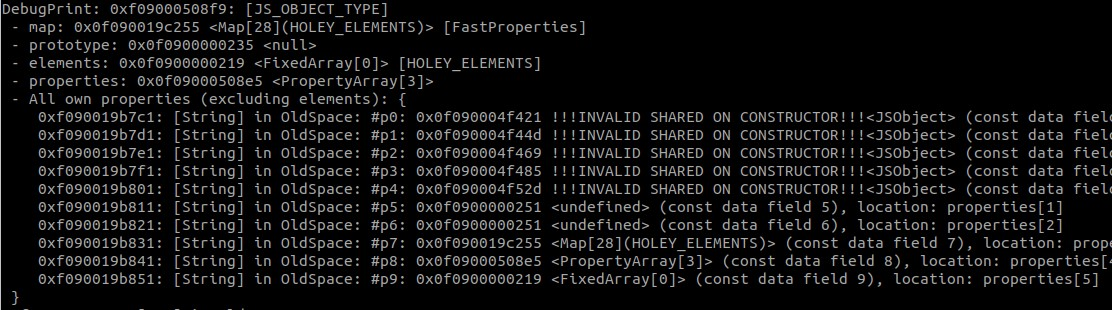
For a great introduction to how v8 does property storage, I recommend reading Fast properties in V8. The important takeaway from this article is that v8 utilizes both in-object properties as well as a property store, and the location of properties is specified by the object’s map. In this article we see that “the number of in-object properties is predetermined by the initial size of the object. If more properties get added than there is space in the object, they are stored in the properties store.” So let’s take a look at the layout of our subject object.
The first image is the %DebugPrint(subject) output, in which we see that subject has 9 in-object properties, and 1 located at properties[0]. This tracks with what we expect, since the object was created with 9 properties initially, and 1 was added later. In GDB, we can see how the properties are stored. (Note: the value 1 is stored as a 2 because SMIs are shifted to the left 1 bit).

So the first clue we have that something is wrong lies in the fact that the map of our source object expects 9 in-object properties, but the corrupted object only expects there to be 4. With debugging statements, I was able to determine that subject kept its layout after all properties were changed to empty objects. Additionally, all calls to throwaway() and func() returned objects with the same layout until after the IC runtime clone implementation changed to the fast path. This makes a lot of sense given the commit message, so the next piece to examine is the source code and what happens in the IC clone functions.
While the bug exists in the IC code, I do not think a lot of background information of this component as a whole is needed to understand the vulnerability, so I will not discuss it at length. There are already a good amount of write-ups of previous bugs found in the inline cache, my favorite of which is The Chromium super (inline cache) type confusion by Man Yue Mo. Another go-to article for this topic is JavaScript engine fundamentals: Shapes and Inline Caches by Mathias Bynens and Benedikt Meurer. At a high level, the IC is meant to speed up property lookups by caching an object property’s offset within the bytecode itself. It is responsible for collecting some profiling data on accessing an object and using that to speed up certain operations, such as object cloning.
Source Code
For both throwaway() and func(), the generated bytecode shows that there is a CloneObject instruction. Here is the relevant Ignition handler for that opcode:
1
2
3
4
5
6
7
8
9
10
11
12
13
14
15
16
17
// CloneObject <source_idx> <flags> <feedback_slot>
//
// Allocates a new JSObject with each enumerable own property copied from
// {source}, converting getters into data properties.
IGNITION_HANDLER(CloneObject, InterpreterAssembler) {
	TNode<Object> source = LoadRegisterAtOperandIndex(0);
	TNode<Uint32T> bytecode_flags = BytecodeOperandFlag8(1);
	TNode<UintPtrT> raw_flags = DecodeWordFromWord32<CreateObjectLiteralFlags::FlagsBits>(bytecode_flags);
	TNode<Smi> smi_flags = SmiTag(Signed(raw_flags));
	TNode<TaggedIndex> slot = BytecodeOperandIdxTaggedIndex(2);
	TNode<HeapObject> maybe_feedback_vector = LoadFeedbackVector();
	TNode<Context> context = GetContext();

	TNode<Object> result = CallBuiltin(Builtin::kCloneObjectIC, context, source, smi_flags, slot, maybe_feedback_vector);
	SetAccumulator(result);
	Dispatch();
}
The path from code generated to handle this instruction to the patched function is Accessor Assembler::GenerateCloneObjectIC() -> RUNTIME_FUNCTION(Runtime_CloneObjectIC_Miss) -> CanFastCloneObjectWithDifferentMaps(). The purpose of the vulnerable function is to determine if a given target map can be used for a clone operation without needing to change the property layout, based on the source map. This is important because of what a comment within the function states: “the clone IC blindly copies the bytes from source object to result object.” Therefore, certain guarantees have to be made about the chosen map so that the target object will have a compatible property layout with the source object. In the original code, there was the check for source_map->instance_size() >= target_map->instance_size(), which has since been removed and replaced with more detailed checks. This check was lacking in part because the instance size does guarantee a particular property layout, which I will discuss later. The question now is how to get an incompatible target map to pass this check.
It is helpful to look at the Runtime function and see how it will call the vulnerable function. CanFastCloneObjectWithDifferentMaps() is only called if we are in the case of FastCloneObjectMode::kDifferentMap. According to a code comment, this happens when the clone has an empty object literal map. In our specific example, this happens because the cloned object is instantiated with __proto__: null, and GetCloneModeForMap() returns FastCloneObjectMode::kDifferentMap for this construct.
1
2
3
4
5
6
7
8
9
10
11
12
case FastCloneObjectMode::kDifferentMap: {
	Handle<Object> res;
	ASSIGN_RETURN_FAILURE_ON_EXCEPTION(isolate, res, CloneObjectSlowPath(isolate, source, flags));
	Handle<Map> result_map(Handle<HeapObject>::cast(res)->map(), isolate);
	if (CanFastCloneObjectWithDifferentMaps(source_map, result_map, isolate)) {
		DCHECK(result_map->OnlyHasSimpleProperties());
		nexus.ConfigureCloneObject(source_map, MaybeObjectHandle(result_map));
	} else {
		nexus.ConfigureMegamorphic();
	}
	return *res;
}
At this point, CanFastCloneObjectWithDifferentMaps() is used to see if we can switch to the fast path. The next item to examine is how the target map is selected in the first place. Based on the code above, we see that the target object is returned by CloneObjectSlowPath().
1
2
3
4
5
static MaybeHandle<JSObject> CloneObjectSlowPath(Isolate* isolate, Handle<Object> source, int flags) {
	Handle<JSObject> new_object;
	if (flags & ObjectLiteral::kHasNullPrototype) {
		new_object = isolate->factory()->NewJSObjectWithNullProto();
...
If the target has a null prototype, such as in the regression test, then we call NewJSObjectWithNullProto(). A quick test shows that creating an empty object causes it to start with space for 4 in-object properties. When objects are first instantiated, they are given a certain amount of unused space for properties, even if they have yet to be assigned (see Slack tracking in V8), so this makes sense. And now the layout mismatch makes sense as well. A target object is created without space for a lot of in-object properties because they do not exist yet, and its instance size is smaller than the source object and therefore passes the check.
This is how a target map is chosen that will switch our code to the fast path. Now, when the source object is copied, the code tries to place 9 properties within the target object. However, the target map only expects 4 properties to be there, so it believes properties 5-10 will be in the property store. The property store was copied from the source as well, and is too small for this. So when we access certain properties, we will look beyond the bounds of the property store, which is allocated just in front of the target object. The slow path would have made more room in the object and updated the map, but the fast path does not.
The last thing that I was curious about was why we needed to change the values of all the properties of subject and then have the IC run again. I found that this was important for the last check in CanFastCloneObjectWithDifferentMaps(). Basically, running the IC twice is needed for the target map to have more generic representation handling. It is also important that every property changes in the object that is being cloned, and it must be from either smi->heap object or heap object->smi. The code below shows how this check is implemented. Once this check passes on the second IC run for func(), the function returns true, and we begin to use the fast path for cloning the object.
1
2
3
4
5
6
7
8
9
for (InternalIndex i : target_map->IterateOwnDescriptors()) {
	PropertyDetails details = descriptors->GetDetails(i);
	PropertyDetails target_details = target_descriptors->GetDetails(i);
	DCHECK_EQ(details.kind(), PropertyKind::kData);
	DCHECK_EQ(target_details.kind(), PropertyKind::kData);
	if (!details.representation().MostGenericInPlaceChange().Equals(target_details.representation())) {
		return false;
	}
}
Summary
The IC attempts to optimize the code to clone an object if it can determine enough information about the source map and expected target map. This fast path will simply copy bytes from the source object to the target object. It was possible to create a source object with several in-object properties and force a target to be chosen that does not have space for the in-object properties. Due to the mismatch, the target map allows for invalid property accesses that can be used to corrupt an object.
Patch
The patch modifies the checks in CanFastCloneObjectWithDifferentMaps() so that it does not simply look at the size of the property stores for both maps, but also verifies that there is room in the target object for all in-object properties from the source.
1
2
3
4
5
6
7
8
9
10
11
12
13
14
15
16
17
18
   if (source_map->instance_type() != JS_OBJECT_TYPE ||
       target_map->instance_type() != JS_OBJECT_TYPE ||
-      source_map->instance_size() < target_map->instance_size() ||
       !source_map->OnlyHasSimpleProperties() ||
       !target_map->OnlyHasSimpleProperties()) {
     return false;
   }
-  if (target_map->instance_size() > source_map->instance_size()) {
+  // Check that the source inobject properties are big enough to initialize all
+  // target slots, but not too big to fit.
+  int source_inobj_properties = source_map->GetInObjectProperties();
+  int target_inobj_properties = target_map->GetInObjectProperties();
+  int source_used_inobj_properties =
+      source_inobj_properties - source_map->UnusedPropertyFields();
+  if (source_inobj_properties < target_inobj_properties ||
+      source_used_inobj_properties > target_inobj_properties) {
     return false;
   }
This patch was actually incomplete, and another check was added to this function as well (see related issue).
The exploit
While there have been many examples of v8 bugs being turned into exploits, I knew that this was going to be slightly more challenging because of the movement towards a full implementation of the v8 sandbox. While it is not yet complete, there are a decreasing number of 64-bit pointers and means to gain arbitrary code execution. Because of this, I started out with no clear path to exploitation, and needed to spend time experimenting with different methods. Here I will cover the various things I tried, what worked, and what did not.
Links to my code in order to follow along with the writeup:
V8 Sandbox
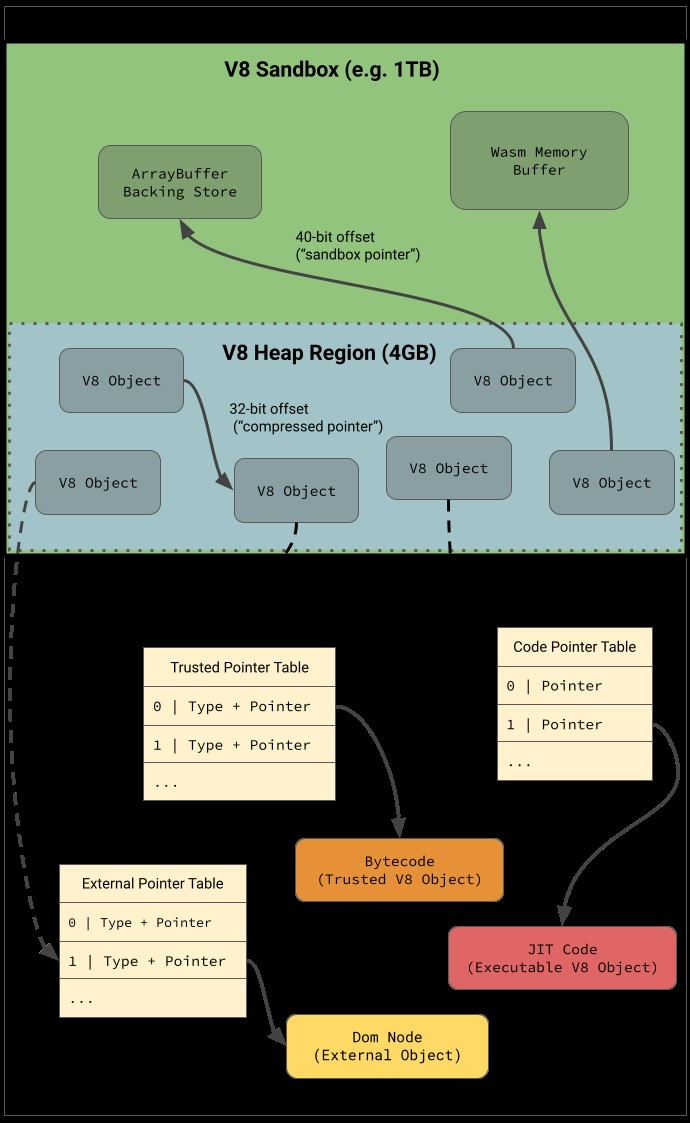
v8 has been using pointer compression for quite some time, meaning that isolates have a smaller address space for their heap, and can mostly utilize 32-bit compressed pointers to increase efficiency. However, various 64-bit pointers have remained in the isolate’s heap over time, and these have been abused to achieve arbitrary read/write and code execution within the larger process address space. Some notable ones for exploitation were pointers to ArrayBuffer backing stores, code objects, and the Wasm memory area. The v8 sandbox is an effort to rid the isolate of these pointers, as well as other items that can be corrupted to gain code execution, by removing them from a 40-bit sandboxed region (see diagram below). Part of this includes modifying objects like ArrayBuffers to only use 40-bit “sandboxed pointers” as offsets for their backing store, relative to the sandbox base. The project is a very large undertaking and is still not completely finished. However, there has been a great deal of progress recently and it has necessitated new exploitation techniques to be looked at over the past year. Therefore, the challenge was to figure out what sensitive pieces still existed within the sandbox.
Recent work
Just before v8CTF was announced, there were a few really great write-ups that came out detailing some modern v8 exploitation techniques. The first was the v8box write-up from Google CTF 2023. This challenge involved exploiting v8 using the memory corruption API. The solution provided by the author overwrote Ignition bytecode located within the v8 heap in order to gain control of the stack pointer. At this point, a ROP chain could be used to pwn the process. The next article was Getting RCE in Chrome with incorrect side effect in the JIT compiler by Man Yue Mo. The technique they used was injecting shellcode into a JIT function by returning an array of float values. Then, their exploit modified the code object for the function so that calling it would jump to a slightly different offset than was intended, and the new code path would execute arbitrary instructions. Finally, Exploiting Zenbleed from Chrome by Trent Novelly showed a similar technique to the last one, but he used the JIT function to copy code from the isolate heap to the Wasm code area. This is a more generic implementation, allowing for lengthier shellcode to be used without the need to encode it with short jumps. This general technique goes back though, as both authors cite this writeup by 2019, who first created it.
While these write-ups were very helpful to learn from, new sandbox improvements meant that none of these techniques would work completely since I immediately saw that the Function object no longer pointed directly to JIT code. :’(
Getting Read/Write Within the Sandbox
While escaping the sandbox was going to be the biggest challenge, I knew that any attempt was going to require arbitrary read/write within the 40-bit sandbox. My initial primitive was the ability to overwrite an object’s metadata on the v8 heap, so I modified the regression test code to overwrite the length of an array. Now, I could use this array to read and overwrite adjacent objects. The object that I chose to overwrite was an ArrayBuffer because of its ability to easily read/write various byte sizes, as well as the fact that it has a sandboxed pointer for its backing store that I can modify. I also placed a property in my victim object that is a pointer to another object. I could use my OOB read from the initially corrupted array to read this pointer, giving me an addr_of primitive as well.
Looking back, I would probably do this differently, but I wanted to include the original code that I used to retrieve the flag. As a result, this post will describe what I did and not necessarily what is ideal. Hopefully later submissions will have better code that I have since fixed up.
Gaining More Primitives
Getting to this point was very straightforward, but updates to the sandbox meant that creating a full exploit was going to require a novel exploitation technique. The go-to method for exploiting v8 in all of the examples that I could find was to corrupt a code object; however, this was recently patched. Based on the “Recent Work” section I had three areas that I wanted to examine.
1. What is left of the Code Object on the heap?
Not much. At least not a 64-bit pointer or a helpful offset. I spent a lot of time looking through structures in the Function object that would be useful to modify or read, but I began to realize that this would not be the path of least resistance. I knew that I could still write ROP gadgets into the JIT code, but I was unsure of how to find the code’s address, and also how to jump to it.
2. Can we take control of RSP?
This technique seemed more promising as I found that Ignition bytecode was still stored in the v8 heap. I was also able to use my earlier primitives to retrieve the address of the bytecode and modify it. I used the Google CTF writeup mentioned before in order to take control of rsp and have it point to an area of the v8 heap that I could write to in order to assemble my ROP chain. However, there were a couple challenges while doing this. First, there were various checks and writes in the trampoline code that meant that the fake object which I passed as my argument needed to have specific values at specific offsets. This took some troubleshooting in GDB, and had to be redone when I tested the exploit against the chrome binary, as the offsets seemed to change slightly. The second issue was that rsp is set to the value of the argument that I give the function, which happens to be an object. Objects in v8 have their address end in a 1, because of pointer tagging. This meant that my stack would not be properly aligned. Thankfully, I was also able to specify the initial return address from running the bytecode before relying on my ROP chain, which I could point to a gadget that aligns rsp.
Getting control of the stack meant that I could jump to JIT code, if I had an address. I continued searching for pointers to JIT code, as well as any pointers into the d8 text section or libraries. I was able to find 64-bit heap addresses, but offsets did not seem reliable enough to create a ROP chain. Therefore, I chose to look for other potential areas to store/find ROP gadgets.
3. Can we still execute our shellcode in the Wasm region?
An old path to running arbitrary shellcode in v8 was overwriting the Wasm code region. This area is marked rwx, which is perfect for exploitation. However, it exists outside of the sandbox, so I knew I wouldn’t be able to directly write any code here. However, the ability to use overwritten JIT code seemed even more impossible at this point, and this gave me an idea. What if we could write gadgets into the Wasm code, just like the JIT function code? The WebAssembly.Instance object on the heap still had a 64-bit pointer to where the code is located, so I would know where to jump. This actually turned out to be pretty straightforward, and I encoded the x86 instructions into store operations in WebAssembly text (WAT) code. I could have attempted to link the gadgets together with short jumps, but since I already had the ability to use multiple gadgets I just decided to write them separately. I also chose to employ the idea from Exploiting Zenbleed from Chrome to create a generic copy from the isolate heap to the Wasm area, meaning that I could run arbitrary shellcode with the same encoded ROP gadgets. Now I had the gadgets for my ROP chain, their addresses, and arguments to copy arbitrary shellcode to a known Wasm address. The last step was to end my ROP chain with the address where I copied the shellcode, execute it, and print the flag.
Below is the .wat file that I used to encode my gadgets. The offsets from the Wasm code base were consistent across runs.
1
2
3
4
5
6
7
8
9
10
11
12
13
14
15
16
(module
  (type (;0;) (func (param i32)))
  (func (;0;) (type 0) (param i32)
    local.get 0
    i64.const 0xc359c35ec35f <- pop rdi; ret; pop rsi; ret; pop rcx; ret;
    i64.store
    local.get 0
    i64.const 0xc3a4f3       <- rep movs BYTE PTR es:[rdi],BYTE PTR ds:[rsi]; ret;
    i64.store
    local.get 0
    i64.const 0xc310658d48   <- lea rsp,[rbp+0x10]; ret;
    i64.store)
  (table (;0;) 0 funcref)
  (memory (;0;) 1)
  (export "memory" (memory 0))
  (export "func" (func 0)))
I also found that overwriting the 64-bit pointer of the
wasmInstanceobject before executing the Wasm code would cause the process to jump to any address I specified. However, I realized this too late and already made enough progress with pivoting the stack that it did not seem helpful anymore.
Completed Roadmap
- Use the vulnerability to modify v8 heap objects to achieve read, write, and addr_of primitives within the sandbox
- Load WebAssembly with useful gadgets for ROP (done by using store instructions with constants that are encoded instructions) that we can leak the addresses for from the WasmInstance object
- Create a byte array with the final x86 payload to run
- Create and modify v8 bytecode to take control of rsp/rbp
- Use our controlled stack to ROP and copy the byte array to the Wasm rwx page and execute
Success
And now all that is left is to run the exploit on remote.
Acknowledgments
I first wanted to thank the researchers whose detailed write-ups greatly helped me to create my own exploit for this challenge; including Man Yue Mo, Trent Novelly, and 2019. I also wanted to give a huge thank you to the team at Google/Stephen Röttger for starting this program and providing an awesome opportunity to further incentivize research into v8 security!
Conclusion
This competition was a great opportunity to learn about recent v8 exploits and find a new way to escape the partial sandbox. Some of the techniques I used have already been patched, so I am excited to see what methods are used for v8CTF in the future.
References
- Expanding our exploit reward program to Chrome and Cloud
- Fast properties in V8 by Camillo Bruni
- The Chromium super (inline cache) type confusion by Man Yue Mo
- JavaScript engine fundamentals: Shapes and Inline Caches by Mathias Bynens and Benedikt Meurer
- Slack tracking in V8 by Michael Stanton
- Pointer Compression in V8 by Igor Sheludko and Santiago Aboy Solanes
- V8 Sandbox - High-Level Design Doc
- v8box write-up
- Getting RCE in Chrome with incorrect side effect in the JIT compiler by Man Yue Mo
- Exploiting Zenbleed from Chrome by Trent Novelly
- Dice CTF Memory Hole: Breaking V8 Heap Sandbox by 2019